KTM Owners Forum banner

DIY Tyre Changes .............

2 reading
10K views 56 replies 18 participants last post by  Orange dog  
#1 ·
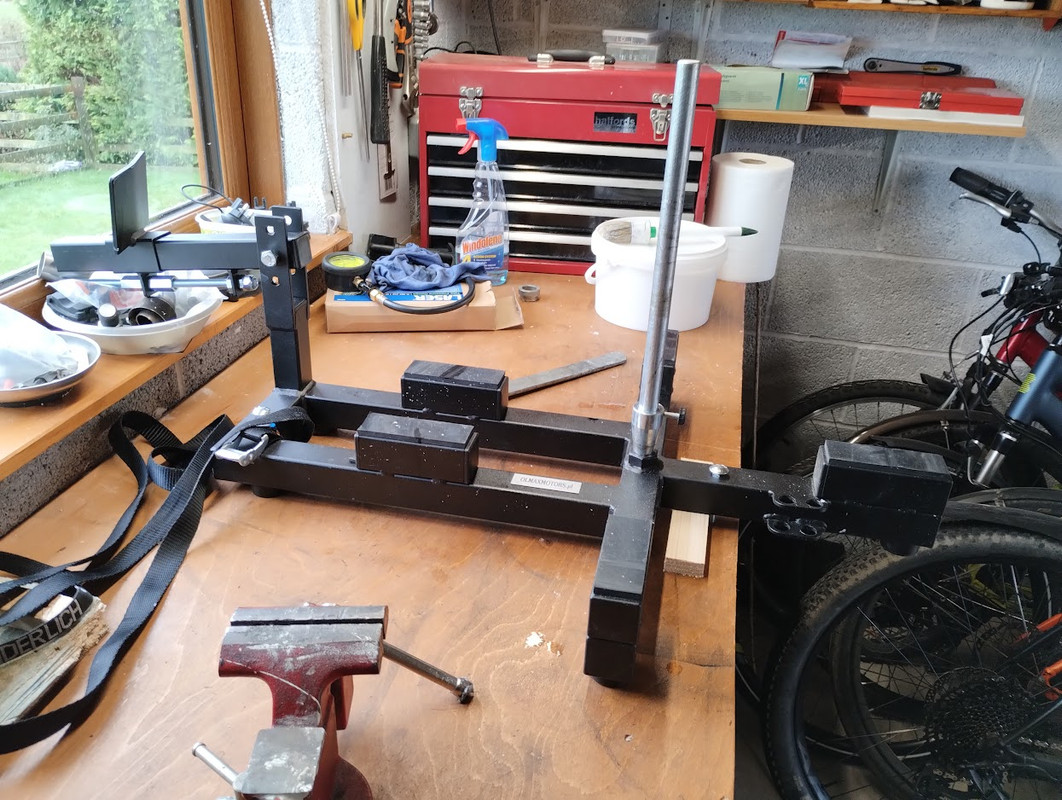
I've been hanging my nose over a tyre wrangling rig (Like this)


Does anyone have / use one of these ?. Suitable for up to 190 / 17" tyres ?. How much skill needed to avoid rim scrapes / damage ?.

Since my local tyre man packed up it's become the best part of a days job for me to get some new boots fitted - in theory this would make things much quicker (and encourage me to put summer / winter tyres on the SM to keep riding all seasons.)
 
#2 ·
I have that one, it's ok but I had to modify it to work properly. The changing head's a cheap nasty one and doesn't hug the rim very well so you're fighting against air for no reason. It takes a bit of getting used, bearing in mind I've changed hundreds on a normal tyre machine, I did work up a sweat the first few times. But saves me a fortune swapping/spinning tyres at the track.

Oh forgot my actual point, boxing day enduro seems to have struck me down with ebola. Get the dearer one on eBay, can't remember the name but my mate has it and it is much better quality
 
#4 ·
A simple bead breaker and some levers should make for an easy tyre change if you have a decent technic, keep as much of the tyre bead in the smaller part of the rim to give you the slack to get it off, get some of them plastic rim covers to lever against if you are bothered about your rims.
 
#12 ·
Thanks for the link .... I keep wobbling back and forth over this one or the Rabaconda. £260 versus £450 (although I think Rabaconda need the higher price to pay for all the marketing they do). Off to the Newark Bike show next weekend, I'll see if there's anything there and make my mind up the Monday after.
 
#8 ·
All you need is a way to break the bead. The rest can be done with a couple of levers and plenty of lube is key. Some of those plastic rim savers to save marking the rims.
First few times I found it difficult, lots of grunting and swearing! But once you get the hang of it its not so bad. You can make it very difficult or quite easy all depending on your technique. Can't emphasise enough the importance of lube!
 
#9 ·
All you need is a way to break the bead. The rest can be done with a couple of levers and plenty of lube is key. Some of those plastic rim savers to save marking the rims.
First few times I found it difficult, lots of grunting and swearing! But once you get the hang of it its not so bad. You can make it very difficult or quite easy all depending on your technique. Can't emphasise enough the importance of lube!
Thats what I said but forgot about the lube, It's that marketing thing again :rolleyes: they make some video that makes it look easy and people fall for it, you still need a good technic also with levers you can feel if you are over stressing the bead, I bet Toprak wishes they had used levers to fit his tyre he would be world WSB champion now.
 
#11 ·
I’ve done them in my 950sm too with cast wheels.

as above I use a vice to break the bead (you need a surprisingly large vice to get over the tyre so check if your gonna buy one. Or look for a bead breaker (I might do this)

then I have a soft surface (garage floor is foam padded) stand on the tyre and keep the opposite side to your levers down in The well of the wheel to give you more “slack”

and again, good lube helps so much! Stops the tyre gripping the rim when you want it to slide over.

nice levers make it nicer like any tool, I use the KTM ones had them years.
 
#17 ·
Decided - bought the Olamax one. £260 delivered (from Poland). This video was the clincher
- seems to be an honest review

I'll do a follow up post when it's arrived & I've used it.

Thanks to all who commented.
That look way more slick than a rabaconda with its dozen tyre levers, I've never got through a full demo video once all those levers come out I assume I may as well just do it by hand lol
 
#14 ·
Even the rabaconda Street takes a bit of effort, it is as simple as their video shows, but I bet they took the old tyre off, lubed it well and refitted before filming.

Bead breaking on my 1290 SAS with old ture took some effort, trick seems to be just keep rotating and loosening and spraying more window cleaner in to loosen it.

Managed to fit a tyre the wrong way and removing it just after fitting was as easy as the videos.

My mates done half a dozen with it on his and mates bikes and said all were easy.

We split cost between us for changer and with fitting around here at £30 a tyre it will pay back fast....

...also stops me bunging away part works, just fitted old rear for winter so newer one can be saved for next tour, otherwise both would of been lobbed with 20-30% remaining life, that's saved me buying an extra rear this summer.
 
#15 ·
I'm the same with part worn's. Off to Pico's Europa in May on the SDGT for 10 days. Gotta start with brand new tyres or I'll be on the canvas by the time I get back. This was last time - Angel GT was brand new on the 1st day !.

Getting back to the point, I can take off & save whatever's fitted pre hol, fit brand new for hol and then use the saved part worn when I get back. 3 trips to the tyre bay and about £90 saved in fitting charges alone and hopefully no faff !


Image
 
#16 ·
Changing tyes is the easy bit, balancing can be an art. Some don't seem to want to balance, others are easy. Saying that I've yet to find a setup with large enough cups for the GT rear so have never bothered, only the front on the KTM. Do both front and rear on the XR (and both on all previous bikes).

Do remember on the GT the rear tyre has to come off/go on, on one side only. The side with the "short lip" (off side, side with spokes) as the near side has a deep lip which prevents the bead sitting into the deep part of the rim to give the required slack to get over the rim edge.
And remember you will need a torque wrench capable of at least 250Nm (normally 300Nm wrench, if you don't already have one) and make sure the rear nut is torqued properly to avoid risking bearing failure.
 
  • Like
Reactions: tl_z_bub
#18 ·
Ha Ha that Robaconda ad is a joke, I thought no way will a tyre be pushed off the bead that easily or removed like it is on the ad, look at this photo of the wheel in the ad
Image


Then look at this with the rounded shoulder needed to hold the tyre bead in place.
Image


It looks to me the shoulder has been removed or mostly removed which would make it much easier to remove the tyre but would also see the tyre come off the rim whilst riding the bike...not what you want. Not sure but the rim OD could have been reduced as well that would also aid easy removal/fitting of the tyre. Done just to make the tyre changer look better than it is.

Sign of the times everything is a con these days :rolleyes:
 
#27 ·
I've done the rear of my 1190R with the mousse changer. Wasn't hard, but there's a lot of lever on the rim action and you have to be very careful not to mark the rim. I don't like rim protectors as they take up room that makes it harder to get the bead over.
I don't have one, but I'm sure the street bike changer is better for your usage as you say. The mousse changer is, unsurprisingly, great for changing mousses though.
 
#31 ·
So, I ordered on 31st December (from Poland) and it JUST arrived today (5/2/24) !). NOTHING at all to do with the supplier (who shipped within 48 hrs) and everything to do with brexit and UK border control.

I've been spanked for VAT, Duty and carrier handling charges to the tune of £78 on top of the original price.

It's still in it's box ...... but I can feel a tyre wrestling match coming on for this Wednesday. I'll post how I get on :)
 
#33 ·
Well, It’s been christened this evening. My 690 SMC changed from Mich 2ct to Goldspeed Wets 120 front 160 rear. Also worth noting I’m on non standard black gloss painted cast wheels.

I reckon it took me 1 1/2 hours including wheel removal & refit. The actual tyre changes & balancing was about 1 hr total.

Thoughts

  • The tools well capable of doing the job. Without any rim damage.
  • Method is absolutely KEY to getting it done. The order in which you do things, the way you set up & position the tools, the tyre lube, the levers. EVERY detail is important.
  • You really also need an airline (pump probably not enough)
  • It would be easier if you could get the tool up onto a sturdy well secured bench. It’s difficult to get the leverages and forces applied at ankle level - particularly on a plastic tiled floor
  • On my first attempt I managed to get the tyres fitted with no damage in about an hour (including balancing). I’m pretty confident that about 30 mins would easily be possible once I’d gotten all the techniques learned.

Bottom line

The tool I bought is well made and quite capable of doing the job. It’s an “amateur” level tool in terms of cost and functionality - but if you’re only changing say 1 pair of tyres a month I’d say it was a good way to go.

I’ve been riding bikes for 48 years now …… today was the 1st time I’ve ever changed a motorcycle tyre. It’s actually quite satisfying to do And it gives me a level of flexibility and independence I’ve never had until now - I like this.

If there were a tyre bay (with a fitter I trust) within 5 miles that did a sub 1 hr turnaround I’d probably not bother. However, at the moment there‘s no one like this locally - so it’s either a mobile fitter or a 20 mile round trip. Either way will cost me £30 and take at least half a day to get done. Add in the convenience of being to fix punctures / change tyre types 24/7 and also potential savings from buying loose tyres online and I think the DIY route is (for me at least) the way tho go.
 
#34 · (Edited)
I have plastic rim protectors to protect the rim and pipe lagging on the Rabaconda when I do road wheels. The Rabaconda easily breaks the bead when the air is out of the tire without going anywhere near the rim. Balancing is easy to do. But I don't have any of them weights that you stick on or a balancing machine.

If you have the Rabaconda streetbike tire changer then its super easy. If you are looking at £50 to have your tires changed then you its paid for itself in 10 tire changes and for a wheel balancer.
 
#35 · (Edited)
Just done this. That’s an M16 mousse in a new 90/90 Metzeler tire. Easy with a Rabaconda. Will be very hard for awhile. The idea is that it will last longer

‘note that mounting it can be particularly difficult’. Really… not with a Rabaconda.

Took me about 15 minutes to change that.
Image


Yes officer 👮 I definitely have tubes in.. Running mousses on the road, well that would be illegal.. 🙂
Image


I can’t justify getting the street bike Rabaconda tire changer because I don’t go through enough tires. But if I did, or just had the money. I would definitely have one and do my own tires. Off road, go through loads of tires. Rabaconda all the way 👍

Run 1 rim lock on the front. 2 rim locks on the back.

believe it or not. I find the rear easier to change than the front

I have an M02 mousse to go in the rear. But going to flip the tire first as there is still life left in it before fitting a new tire

I use silicone grease as mousse lube and paint the stuff on there with a paint brush. I used to use mousse lube but I’m in to not changing my tires as often now and silicone grease lasts longer
 
#36 ·
Recently bought the Olmaxmotors one - first try on the 21" front wheel of my 701 was a complete pain trying to use it loose on the garage floor! Kept moving around along with the stiff sidewalls on the Mitas E07+ meant that you could not get proper leverage on the duck head and ended up finishing it off with tyre levers.

This morning gave it a second go mounted securely to my work bench changing the rear tyre of my 1290 SAR and this time it was a piece of piss - really easy all be it with tyres with a softer tyre wall.


#40 ·
Bench mount ..... I reckon that's the trick !.

I had the same problems trying to use the tool on the floor - really hard to get the leverage and it's slipping around everywhere.

I think I'm going to make a mount for it from plywood with some 3 x 3 wooden rails underneath so that it sits on top of a waist high brick wall i have behind the house. Plenty of room to work around it and hopefully I just put it onto the wall and its good to go.
 
#38 ·
Look at the size of the M02 mousse compared to the old one. It’s huge. I have read that some people put the M02 inside an 80/120 tire
Image

I don’t think that I would have managed that without the Rabaconda. It’s a really big mousse. You have to take very small steps putting the last bead on. It’s very tight. I’m not changing that tire until it’s turned in to a tire with a continuous tread…😂
Image